This project starts out with a basic strapless sheath dress. In order to replicate the look, I did alter the neckline a bit but a simpler neckline will prove to be easier to make. Stitch the dress together at the side seams and iron flat.
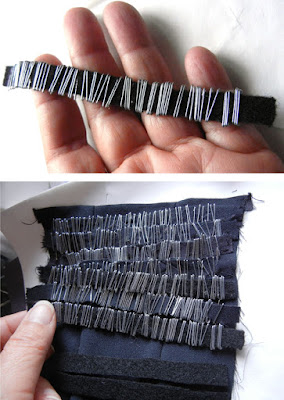
I used the biggest staples I had )1/2' (1cm) in the house and a stapler in good, working condition. Cut strips of felt a tiny bit smaller than the staples. In this case I chose felt because I wanted to staples to hold onto something without sliding around too much.
Cut each strip from edge to edge of the dress.
Cut enough strips to cover the dress from the neckline to just above the hemline. \
Begin stapling from the midpoint of each strip to the edge. Repeat on the other side. Be careful not to staple on top of the preceding staple or you will eventually have problems with the stapler. Adjust the staples...pushing them together AFTER they have been stapled down.
Once you have enough stapled strips, begin pinning each strip from the bottom of the dress up.
Hand stitch each row onto the dress until you have covered the entire dress. If you have designed peaks over the bust line, make tiny strips and carefully fit them in and hand sew. I finished off the top of the dress with a strip of tulle.
When you have finished, fold one edge down and hand sew over the seam allowance of the other side, as close as possible to the staples.
I purposely chose silver staples for this dress, but remember, you can always opt for copper staples if you want a bit of color! And...Contrary to what it seems, I did not come close to using up a whole box of staples! On the other hand, this dress does have a bit of weight to it.
Up next.....the first red carpet event of the year. The Golden Globes!!!! Stay tuned!!!
.
De: Fashion Doll Stylist - https://fashiondollstylist.blogspot.com/2019/01/behind-design-moschino-staple-dress.html
Fecha: January 09, 2019 at 01:00AM
.
Haz clic en la imagen de abajo para ver otro de mis Blogs.
Encontraras mas publicaciones interesantes.


0 comentarios:
Publicar un comentario